Proper Makeup Etiquette For The Girl On-The-Go

article-0-065a38e3000005dc-835_468x428

Running from one place to another, whether in early mornings or long commutes, can be rough. Those solid fifteen minutes to an hour sitting on a train can become vital time to get yourself looking and feeling ready for your day. Applying makeup while on public transportation is nothing to be frowned upon or embarrassed about; rather, it can be seen as use of otherwise ‘dead’ time.

Now, there is an etiquette to doing your makeup without disrupting fellow commuters and avoid eye rolls. Here are some Honeybee approved etiquette guidelines to putting on your makeup on-the-go.

Don’t take up more than one seat. We all pay the same price for our cramped commute. Be courteous and limit yourself and your possessions to one seat. The new mother who has been up since 4 a.m. will thank you.

Don’t use strong smelling products. We understand you want to smell nice, but everyone in your train car may not want to smell like you too.

No plucking, clipping, or trimming. There is a fine line between beauty and personal upkeep. Plucking your eyebrows, clipping your nails, or trimming of any sort are habits better kept in your bathroom at home.

Don’t make putting on your makeup an excuse for taking a seat. Common courtesy and giving up your seat for someone else makes your far more beautiful that any amount of makeup can.

Keep it simple. Use multipurpose makeup. You shouldn’t be hauling your entire collection of makeup with you on your commute. Select a handful of quick and easy applicable products that can be used in multiple ways.

Our Honeybee Beauty Ambassador Erin Bell shares “Bathroom toilet paper or paper towels work as a great multitasker to simply blot skin anywhere from an oily t-zone to lips.” Also, speaking of multipurpose, she adds “Lipstick can be used as a last minute blush”.

Share these quick tips with a friend and have a less stressful on-the-go fix up!

Brow Beaten

Brow Beaten

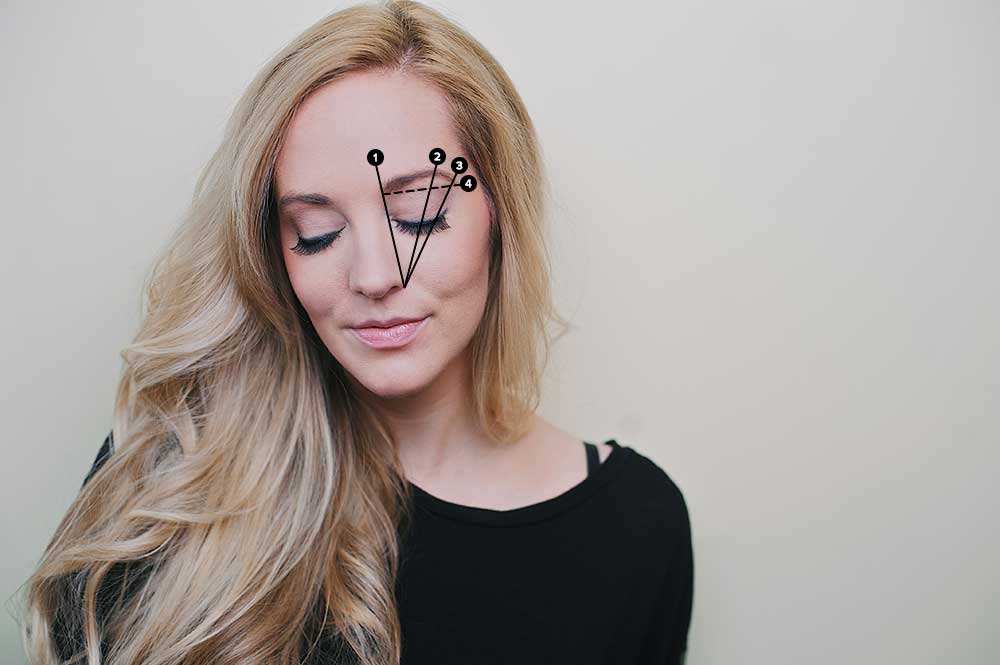
My latest unhealthy beauty obsession is my eye brows. Fuller brows purportedly create a more youthful look and can accentuate other facial features in a more flattering way. Social media is flooded with images of Cara Delevingne and Lily Collins with their Amazonian bushy brows, and Desperate Housewives perma-angry ‘Scouse brow’. They all seem impossible to achieve despite the myriad of YouTube videos showing you how to draw, paint, sculpt, contour and create the perfect brow.

In my effort to copy this look which I tell myself I MUST have, I have been the way of the brow powder, the brow pencil and even the hardcore brow pomade…and failed miserably with each one.

Continue reading “Brow Beaten”

Brush Your Way To Better Skin


A few months ago, I became interested in “dry brushing”. Now that I’m in my 40s (*gads!*) it takes more effort to make my skin look its best. This means eating clean, drinking lots of water, NOT tanning, moisturizing regularly, etc. Dry brushing is purported to promote healthier skin by removing dead skin cells on the surface of the skin, allowing it to breathe and absorb more nutrients. It also stimulates and increases skin cell production, stimulates the lymphatic and circulatory systems, and boosts your immune system. The gentle pressure and brushing sensations are said to have a calming effect; increasing your blood flow reduces stressed areas of the body and stimulates nerve endings in your skin which in turn rejuvenates your nervous system. Last but not least, dry brushing supposedly reduces cellulite by increasing blood circulation to the skin, helping to break down and release toxins that cause cellulite in legs and hips.

This I had to try.

I went on line (amazon.com) and purchased a Yerba Prima Tampico Skin Brush. If you’re going to try dry brushing, you want a natural bristle brush or loofah. Look for bristles that are made from plant fibers. Synthetic bristles can be too harsh and cause irritation. The brush I chose has a removable handle so you can use it in the palm of your hand, or use it with the handle for harder to reach areas like your back.

So how do you do it? It’s best to dry brush when you first wake up in the morning, before you jump in the shower. Here is the recommended dry brushing process:

1. Start with your feet, moving in soft circular movements (always moving towards the heart) first on the bottom of the feet, and then on the top.
2. Work up each leg, one at a time, first the back of the leg (using the same soft circular, always towards the heart, movements) up through the buttock and then the front of the leg. Avoid any delicate skin, like the skin on the insides of the thighs.
3. After you are finished with the lower half, start at the fingertips of one arm; move up the arm (palms of hands, back of hands, forearm, bicep) and towards the heart. Repeat on other arm.
4. Move to the back working your movements towards your stomach, starting and finishing with one side of the back and then the other.
5. When you get to your stomach, start at your lower abdomen and work your way up (make sure to steer clear of delicate areas like the nipples) and end at your chest in an upward stroke.
6. Rinse off and shower as normal.

Skin brushing Tips:
1. Avoid the face! While dry brushing is excellent for exfoliating skin, this body brush will be too rough for the delicate skin on your face.
2. It’s sometimes best to dry brush in the shower (with the water off) since there may be a lot of dead skin brushed off.

How often should you dry brush? For best results dry brush at least two times a week.

I started looking into some of the grand claims of dry brushing. It DOES get rid of dead skin cells, increase circulation (as a brisk walk would) and help the lymphatic system work better, and decrease bloating (as a massage would). However, the grander claims are more suspect. Even if done religiously over time, will dry brushing reduce the appearance of cellulite? Experts like Dr. Carolyn Jacob, a dermatologist in Chicago, feel probably not. Why? Cellulite is a complex problem that involves thin skin and the kind of fibrous bands holding in women’s fat. Dry brushing “won’t change fibrous bands at all,” Dr. Jacob said — a dagger to the hearts of women with cottage-cheese thighs. Twisting the dagger, Dr. Jacob cautioned that avid dry brushers put their skin at risk for inflammation, redness and an eczema-like itchy rash.

So is dry brushing for you? As long as you don’t have any severe skin irritation (acne, rash, eczema, open sore/cut, etc.), I say yes. It is an invigorating way to start the day, and it really does make your skin feel smooth and healthy.

It’s Probably Time to Toss It


When was the last time you cleaned out your make-up drawer? Be honest. Six months ago? Sometime last year? It’s probably a good idea to go through your stuff and throw some of it out. Make-up doesn’t last forever.

To get maximum longevity from your cosmetics, store them in a cool, dry place, away from direct sunlight. Always close the lids tightly after use. Here are some common cosmetics and the recommended shelf life for each after it has been opened for the first time. These recommendations apply to conventional cosmetics, though some natural cosmetics may not last as long.

• Mascara: Toss your mascara after 3 months. Mascara has the shortest life span of all make up because the risk of transferring bacteria back and forth from your eye into the mascara tube is so great. If your mascara starts to dry out before its 90 days is up, throw it away. Don’t add water or saliva to your mascara to rewet it. Doing so will only increase your chances of getting an eye infection.

•Eye pencils: Eye pencils can be kept up to 2 years. To make sure you’re using a clean tip, sharpen before each application.

•Eye shadows: Powder shadows will keep 2 years.
If you’ve had an eye infection, you’ll need to throw out all the eye make-up and applicators you used from the time you developed symptoms. The virus or bacteria that caused the infection has probably taken up residence in your make up, so using those cosmetics again could cause you to develop another infection.

•Lipsticks: You can keep conventional tube lipsticks and lip pencils for 2 years. As with eye pencils, sharpen your lip pencils before each use. Natural lipsticks should be discarded after one year.

•Blushes and powders: Discard your powder blushes and powders after 2 years.

Think of your make-up a bit like you do your food. If it smells weird, develops a film, or has a mold-green tint to it, it’s gone bad and needs to be tossed out.

Using clean brushes and sponges will help lengthen the life of your cosmetics. Be sure and wash or replace your applicators frequently. See our November 8, 2012 blog post about proper care of your cosmetic brushes.

Here’s a tip: when you open a cosmetic for the first time, write the date on the product. It will help you keep track of how long you’ve had the make up so you’ll know when it’s time to throw it away.

Okay, no more excuses. Take an hour out of your weekend to go through that make-up drawer and the make-up in your purse. Not only is it healthy, but then you can make room for more stuff!!

How to Properly Care for Your Cosmetic Brushes


Professional makeup brushes are an investment. And, like any other investment, we want a great return. One of best ways to ensure that will happen is proper brush care. Did you realize that makeup build-up, especially foundation, makes your brushes feel scratchy? If you have sensitive skin, cleaning your brushes regularly will help them stay soft and lush. It is imperative you make a point to clean the accumulated gunk out of your brushes regularly. This is not only good hygeine (for you, your skin, etc.), but it keeps your brushes in good shape.

Wet the hairs under the faucet with tepid to warm water with the hairs pointing downwards – this will help prevent any water getting in to the ferrule (metal part) or down in to the handle for brushes that don’t have ferrules.

Using a mild shampoo, liquid hand soap or castile soap, squirt a little on your fingers and apply it to the hairs from ferrule to hair tips. Gently squeeze the hairs from ferrule to hair tips over and over adding a little water at a time. Rinse and repeat until the water runs clear. Make sure when you are rinsing to keep the brush hairs pointing down.

After your brushes have a good bath, brush them off a little on a clean paper towel and lay them to dry on their side on a paper towel or a regular towel. It is also a good idea to reshape the brush at this point in time to prevent splaying. Whatever shape your brushes are left in to dry is the same shape they will be when they are dry. You don’t want your contour brush looking like a tapered blush brush, do you? Similarly, if the shape is off, wetting/washing your brush will allow you to reshape a brush. Lay kabuki’s and any other stand-up brush on their side. Never leave them to dry brush hairs up in a brush holder. The water can run down in to the ferrule and loosen the glue holding the brush together over time.

On top of cleaning, conditioning your brush with a quality hair conditioner will help keep the bristles soft. It’s not something that needs to be done as often general washing, but it is a good idea to do it often enough–like once a month. Mostly, it depends on how often you use and wash your brushes.

Lastly, let brushes dry completely before using. Dry time will depend on size and brush density.